Hi~
Dynamite Korean here.
In this article we are going to learn how to make cover image for the tripod(bottom) in 360 VR video.
Prepare the 360 VR video first.(with 360cams or others)
-I'm gonna post up the recording experience in other article.
I used Adobe Photoshop CC for this work.
When you make 360 VR video uncomfortable thing follows you every time.
It's you, yourself(or tripod) that comes up at the bottom of the video.
You can see you(tripod) in the video.
So in here we gonna learn how to cover you(tripod) with the image.(which you made or you have form others)
360 VR video is not a flat image so it's hard to use the image that you want on it.
I searched the way to do that by google or some Korean blogs but it was really hard to find it. Because not many people are using 360 VR video yet.
Anyway I found it how to do. :)
So I'm gonna clean all the info that I know in here to make the cover image.
Prepare the image that you gonna use for the covering.
This is the logo image of Dynamite korean page. for ad~
When you put the 360 VR video on the editing tool like Sony Vegas, Adobe Premiere, etc the flat imaged video will come out for editing.
The cameras that I'm using has 2 lenses in 1 camera.
So the image(video &photo) need to be stitched by software.
And they have different resolutions.
-Ricoh Theta S : FHD 1920*960
-LG360Cam : 2K 2560*1280
I don't know why but 360cam video has 2:1 ratio.
(I need to have 4K now, I need to buy Samsung 4K now.)
Let's go to main part now. :)
I need 360 image for photoshop so capture 1 part for checking the cover image.
and play the photoshop with same canvas size as your flat 360 VR video.
ex) for LG360Cam : 2560*1280
you need to start it with the size as flattened video.
Put captured image from video into photoshop and change the image ratio to 1:1.
(to 2560*2560 pixels) by menu-image-image size
and after that rotate the image 180 degree by menu-image-image rotation-180.
Since the tripod is at the bottom of the video we need to rotate it.
It might be hard to understand but after you do some works with this you may understand what I mean.
(Frankly I didn't understand why I need to do this.)
If you put the camera on the ceiling,you don't need to rotate the image. :)
You can see the difference between rotated one and other one.
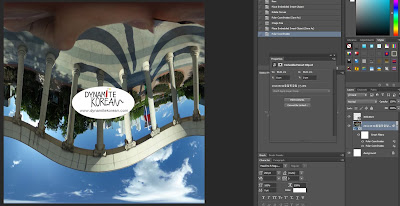
Now let's change the flat image to 360VR image(distorted) by menu-filter-distort-polar coordinate-rec to polar.
Then put the cover image on you(tripod).
You need to put the cover image after change the image to 360VR.
Now flat the image again by distort-polar to rec.
At this time your cover image will be automatically changed too.
But you can't change both two image(captured photo & cover image) at the same time.
So change it one by one please.
Edit it one by one.
Yes! It's done!
Now you can see competed image on your monitor.
Then change the image ratio back to 2:1.
Although you rotate the image again the edited cover image won't be rotated cause the size of it is different from video image.
Please rotate the image after you save it into png image(as watermark).
The image is rotated 180 degree so the left & right can go opposite to the image that you need.
So check it well and use it. :)
You may put the edited image on the video for editing.
Now we can use this watermark(alpha image)on the video.
Wow!
It is so long article cause I need to talk alot with detailed explanation.
But you can catch it so easily, if you follow this article. :)
Please check out my 360 video on my youtube channel.
You need to watch it by youtube application or google chrome browser.
More articles will be here.
Please visit again and support my blog(channel).
Thanks~^^


댓글 없음:
댓글 쓰기